Examples
Windows
Linux
SimpleViewer
- Build sample(e.g., SimpleViewer)
$ cd Samples/SimpleViewer
$ make
- Run a sample
$ cd Bin/x64-Release
$ ./SimpleViewer
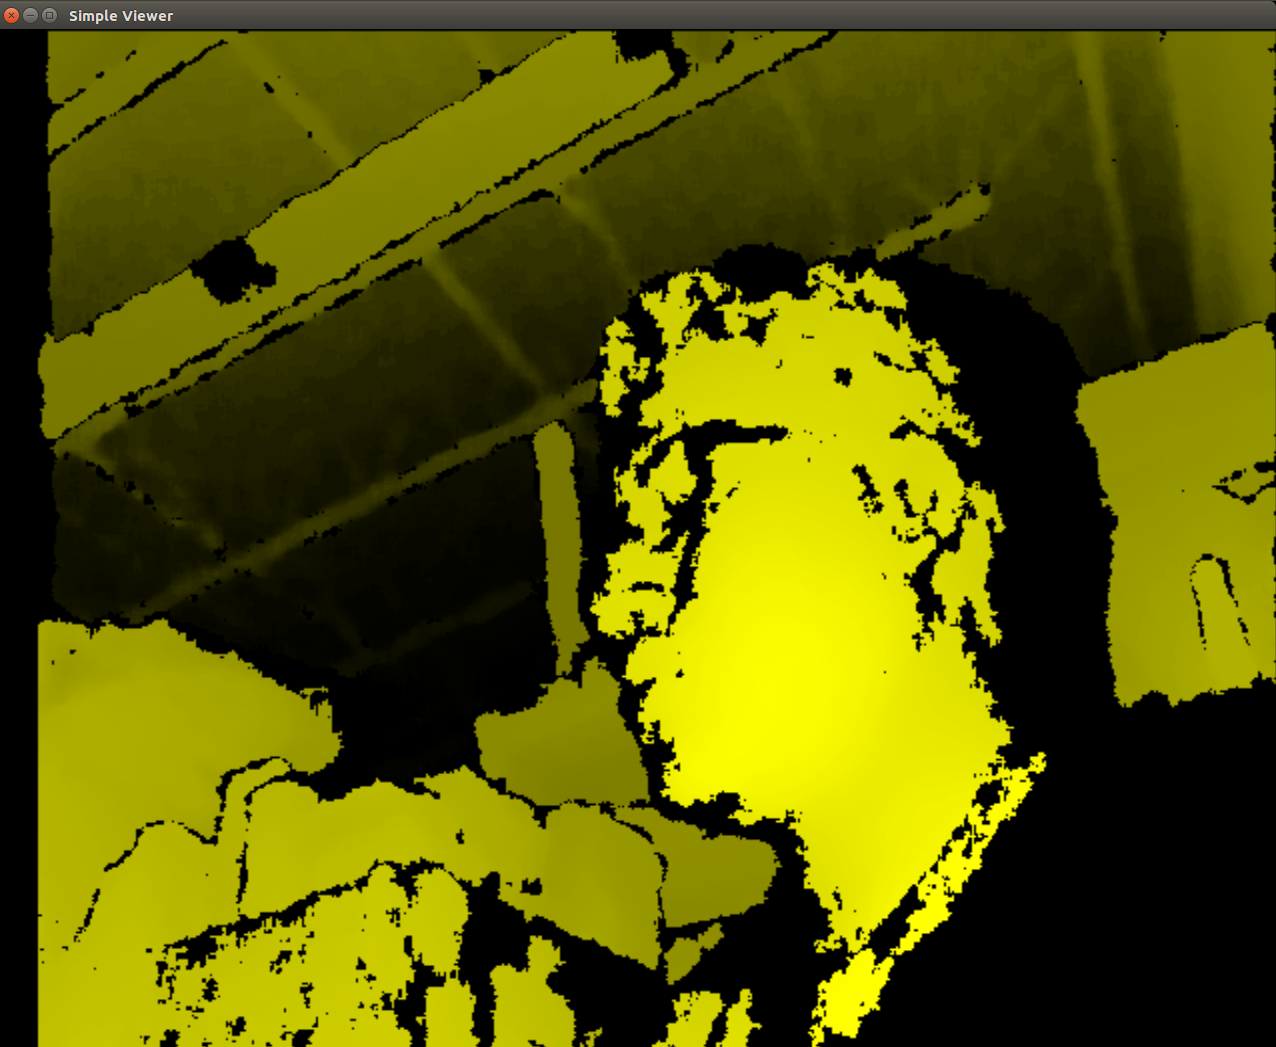
- You should now be able to see a GUI window showing the depth stream video. Here is an image showing the GUI window
ClosestPointViewer
- Build sample
$ cd Samples/ClosestPointViewer
$ make
- Run the sample
$ cd Bin/x64-Release
$ ./ClosestPointViewer
The gif shows the closest point (marked by red and blue points).

Note
- If the Debian Jessie Lite is used for testing, it may require the following installation for properly start the viewer.
$ sudo apt-get install libgl1-mesa-dri
Depth Stream using C++
Prequisites
Note
PCL 1.8 is not available in the Ubuntu Xenial (16.04) repositories PCL 1.7 does not have the required OpenNI2 libraries to run the Orbbec Astra with PCL 1.7 also has visualization issues due to VTK bugs, which were fixed in 1.8
Warning
This was only tested in Ubuntu 16.04 with PCL 1.8.1rc2 compiled from source and OpenNI2 provided from Structure.io
Code Example Overview
- openni_read.cpp
- Using the OpenNI2 library, open an depth camera stream and return the number of points
- pcd_write.cpp
- Using the PCL library, test writing a random point cloud to a file
- pcl_openni_viewer.cpp
- Using the PCL and OpenNI library, open and stream a depth device
Note
The pcl_openni_viewer.cpp example does not work with the Orbbec Astra as you need OpenNI2
- pcl_openni2_viewer.cpp
- Using the PCL and OpenNI2 library, open and stream a depth device
- pcl_visualizer.cpp
- Using the PCL library, test generating and viewing point clouds
Setting up OpenNI2
Note
The way structure.io has their package setup, you cannot easily install it into your system. Therefore, you need to point to the directory you extracted OpenNI2 every time you want to use the code…
Reference the OpenNI2 setup earlier in this document.
Installing PCL
Note
You can use a pre-built .deb for installing on Ubuntu Xenial (16.04) from the following link: https://larrylisky.com/2016/11/03/point-cloud-library-on-ubuntu-16-04-lts/
Warning
If you go with the pre-built .deb, you will need to edit the CMAKE file in /usr/share/PCL-1.8. (TODO: see below) Also, with the pre-built .deb, you do not have openni2 PCL compatibility. :(
Install Prequisites:
sudo apt-get update
sudo apt-get install git build-essential linux-libc-dev
sudo apt-get install cmake cmake-gui
sudo apt-get install libusb-1.0-0-dev libusb-dev libudev-dev
sudo apt-get install mpi-default-dev openmpi-bin openmpi-common
sudo apt-get install libflann1.8 libflann-dev
sudo apt-get install libeigen3-dev
sudo apt-get install libboost-all-dev
sudo apt-get install libvtk5.10-qt4 libvtk5.10 libvtk5-dev
sudo apt-get install libqhull* libgtest-dev
sudo apt-get install freeglut3-dev pkg-config
sudo apt-get install libxmu-dev libxi-dev
sudo apt-get install mono-complete
sudo apt-get install qt-sdk openjdk-8-jdk openjdk-8-jre
Source OpenNI2 libraries:
source ~/OpenNi/OpenNi-Linux-x64-2.3/OpenNIDevEnvironment
Download and build PCL:
mkdir ~/tmp
cd ~/tmp
git clone https://github.com/PointCloudLibrary/pcl -b pcl-1.8.1rc2
cd pcl
      mkdir build
      cd build
cmake -DCMAKE_BUILD_TYPE=None -DCMAKE_INSTALL_PREFIX=/usr \
      -DBUILD_GPU=ON -DBUILD_apps=ON -DBUILD_examples=ON \
      -DCMAKE_INSTALL_PREFIX=/usr ..
      make -j4
Building C++ Code
source ~/OpenNi/OpenNi-Linux-x64-2.3/OpenNIDevEnvironment
cd /path/to/your/code/src
mkdir build
cd build
cmake ..
make -j4
Running C++ Examples
source ~/OpenNi/OpenNi-Linux-x64-2.3/OpenNIDevEnvironment
./pcd_write_test
./openni_read
./visualizer -h
./openni_viewer --help
./openni_viewer -l
./openni_viewer
Depth Stream using Python and OpenCV
You can view depth data in Python from the Orbbec Astra using the OpenNI, OpenCV, and Numpy libraries. OpenNI is used to communicate with the camera. Numpy is used to manipulate the data to be displayed in a 2D window OpenCV is used to display the manipulated depth data.
Install OpenCV-Python
sudo -H pip install opencv-python
To start, you should source the Orbbec build environment from earlier:
$ source ~/OpenNi/OpenNI-Linux-x64-2.3/OpenNIDevEnvironment
Now create a new Python file and put the following code in it:
#!/usr/bin/python
import cv2
import numpy as np
from openni import openni2
from openni import _openni2 as c_api

# Initialize the depth device
openni2.initialize()
dev = openni2.Device.open_any()

# Start the depth stream
depth_stream = dev.create_depth_stream()
depth_stream.start()
depth_stream.set_video_mode(c_api.OniVideoMode(pixelFormat = c_api.OniPixelFormat.ONI_PIXEL_FORMAT_DEPTH_100_UM, resolutionX = 640, resolutionY = 480, fps = 30))

# Function to return some pixel information when the OpenCV window is clicked
refPt = []
selecting = False

def point_and_shoot(event, x, y, flags, param):
                global refPt, selecting
                if event == cv2.EVENT_LBUTTONDOWN:
                                print "Mouse Down"
                                refPt = [(x,y)]
                                selecting = True
                                print refPt
                elif event == cv2.EVENT_LBUTTONUP:
                                print "Mouse Up"
                                refPt.append((x,y))
                                selecting = False
                                print refPt

# Initial OpenCV Window Functions
cv2.namedWindow("Depth Image")
cv2.setMouseCallback("Depth Image", point_and_shoot)

# Loop
while True:
                # Grab a new depth frame
                frame = depth_stream.read_frame()
                frame_data = frame.get_buffer_as_uint16()
                # Put the depth frame into a numpy array and reshape it
                img = np.frombuffer(frame_data, dtype=np.uint16)
                img.shape = (1, 480, 640)
                img = np.concatenate((img, img, img), axis=0)
                img = np.swapaxes(img, 0, 2)
                img = np.swapaxes(img, 0, 1)

                if len(refPt) > 1:
                                img = img.copy()
                                cv2.rectangle(img, refPt[0], refPt[1], (0, 255, 0), 2)

                # Display the reshaped depth frame using OpenCV
                cv2.imshow("Depth Image", img)
                key = cv2.waitKey(1) & 0xFF

                # If the 'c' key is pressed, break the while loop
                if key == ord("c"):
                                break

# Close all windows and unload the depth device
openni2.unload()
cv2.destroyAllWindows()
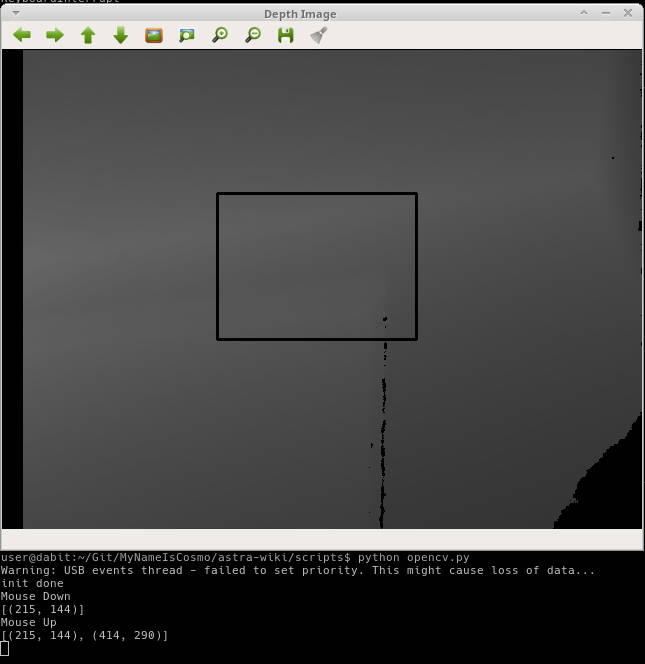
- Run the example code and click + drag on the screen to make a “selection” box. The 2D image coordinates of the selected box are printed to the terminal.
Depth Stream using Python, OpenCV, pyqtgraph, and PCL
Install Prerequisites
- ::
- conda create -n py35 python=3.5 anaconda source activate py35 conda install pyqtgraph conda install pyopengl conda install pyopengl-accelerate ~/anaconda2/envs/py35/bin/pip install opencv-python ~/anaconda2/envs/py35/bin/pip install openni
- ::
- pip install opencv-python pip install openni pip install pyqtgraph pip install PyOpenGL conda install python-pcl sudo -H pip3 install PyQt5 sudo apt install python3-pyqt5.qtopengl python3-pyopengl
Code Setup
Depth Visualization using Python QT
Warning
Work in progress, incomplete.
sudo -H pip2 install pyqtgraph
Depth Visualization using Python PCL
Warning
Work in progress, incomplete
- Download and install Anaconda for Python 2.7
- Install Python-PCL using Anaconda
conda install -c https://conda.anaconda.org/ccordoba12 python-pcl